During the second module of the second year at SAE Institute, we had to do a project in a naive way, that we would then optimize.
Since I enjoy computer graphics, I decided to follow Ray Tracing in One Weekend written by Peter Shirley. And since I also enjoy Rust, it’s the language I chose for this project. Although there are some Rust specific stuff, most of the optimizations can be applied in any programming language, so don’t be scared if you don’t know any Rust.
You can see the code on this repo : https://github.com/St0wy/raytracing/
Table of Contents
Open Table of Contents
The project
When optimizing, it can be sometimes a good idea to change what the program does. For example, you could reduce the number of objects in a scene, so that it can be computed faster. In this case, I wanted to keep the image intact. The goal was to have the same image before and after the optimizations.
To make this possible, I decided on four scenes that would showcase the different features of the raytracer and how some optimizations could impact different cases.
They are all rendered on a 400x400 image with 200 samples per pixel and a ray depth of 30.
Here are all of the scenes :
Three Spheres
This is a scene with three spheres, that are all of a different material. From front to back :
- Dielectric (glass)
- Metalic
- Lambertian (diffuse)

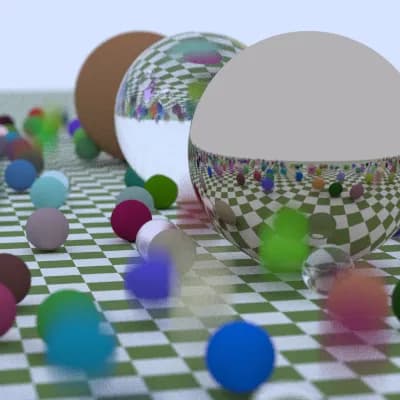
Big Scene
A big scene with a lot of spheres (~400, some are outside of the camera) of different materials. The one on the ground has a checker texture.
The blurry spheres on the front are here to simulate motion blur. It’s like they’re moving while the picture is being taken.
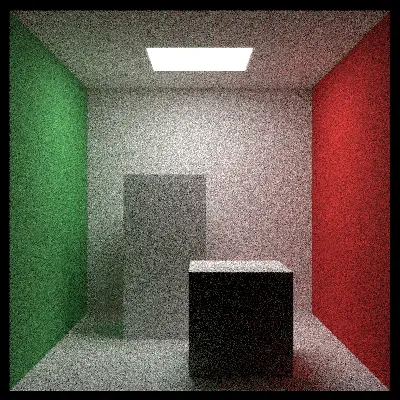
Cornell Box
This is an image that is often reproduced to try the capacites of the lighting simulation of a renderer. It’s a nice test to see the reflexion of the green wall onto the white box. Usually the boxes are rotated, but I didn’t implement that in my renderer.
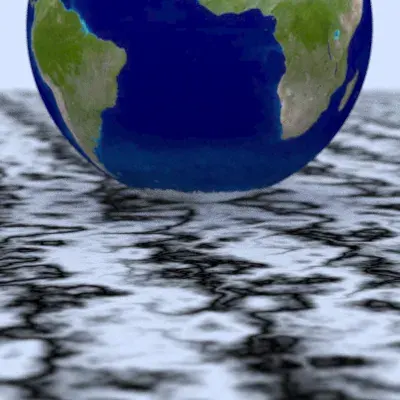
Perlin and Earth
In this image, there is a big sphere as the ground, that has a perlin noise texture. The sphere on top has an image texture of the earth.
Naive Implementation
To have a base to compare to, I will show you the time it take to run each scene :
| Three Spheres | Big Scene | Cornell Box | Perlin and Earth |
|---|---|---|---|
| 3624,3 ms | 405330 ms | 35313 ms | 18502 ms |
(This is measured on my laptop, with an 8 core AMD Ryzen 9 5900HS at 3.30 GHz and 24.0 GB of RAM)
I measured these using the Criterion.rs benchmarking library.
In this case, the project is implemented as an almost exact copy of the c++ code provided, but translated in Rust.
As you can see, there is a big hit on performance from the amount of objects in the big scene. We’ll see how we can reduce that with the first optimization.
Data Oriented
What’s Data Oriented Programming
If you’re not sure what Data Oriented Programming means, I will try to summarize it for you.
It’s basically centered around the idea that the way the data is layed out in your memory, can (and will) impact performance.
When you code in a data oriented way, one of the things that you try to do is having as much data as possible that’s contiguous. For example if you have an array of objects that you want to process, you try to avoid having an array of pointers to these objects, but instead you use an array to these objects.
But this will ruin inheritence !
Yes ! That’s the point ! Since inheritence makes you go through a v-table, it has an heavy impact on performances.
So you’re telling that you remove inheritance, but I thought that Rust didn’t have inheritance ?
Well, kinda. You can’t inherit from an other struct in Rust. Structs can only implement traits. But, you can have a vector of the equivalent of an unique pointer in c++ of traits.
// C++
std::vector<std::unique_ptr<Hittable>> hittables;
// rust
let hittables: Vec<Box<dyn Hittable>>;Since Rust wants to make it obvious when you have a cost in its abstractions, it asks you to add the dyn keyword.
It stands for “dynamic dispatch”, which is the process by which it’s going to get the correct object.
Implementation
Okay, so now how do you have multiple
Hittabletypes ?
Well, this is kind of the ugly part. The way I implemented it in my code, is by having multiple vectors.
let spheres: Vec<Sphere>;
let moving_sphere: Vec<MovingSphere>;
This makes it so that I must add quite a lot of boilerplate when I add a new object, but the speed improvement is hopefully worth it. There may be a better way to implement it, but in my case the program was small enough that it wasn’t worth the effort to investigate this further.
Speed
So, does it really improve performance ? Well let’s look at the benchmark results.
| Three Spheres | Big Scene | Cornell Box | Perlin and Earth | |
|---|---|---|---|---|
| Naive | 3624,3 ms | 405330 ms | 35313 ms | 18502 ms |
| Data Oriented | 3682,6 ms | 282410 ms | 33221 ms | 18627 ms |
As you can see there, for the scenes where there aren’t that many objects, it has a tendency to be slower (at most 1.6%). But for the scene with a lot of objects, there is a 30% increase in speed ! So if the objective is to have a lot of objects, this is the right path.
Boundary Volume Heirarchy
This point is actually covered in Ray Tracing: The Next Week, so I’m not going to go in details on what it is and how it works. I will explain how I implemented it in a data oriented way though !
The basic idea is that we divide the world in a binary tree where each node has an AABB (axis aligned bounding box) that surrounds every objects that’s a child of it. This alows to greaty speed up the collision check rays, since we don’t have to check agaisnt every object in the scene.
Implementation
So, as I said beffore, the truth is a bit ugly when it comes to my data oriented code, but here is the idea of how I implemented it.
So each nodes need to have either a pointer to a node, or to one of the types that can be rendered.
For this, I decided to have a type that would be an index to a hittable object. This type has an index in the array of the object and an enum that say which type it is. The BVH node then has two of these objects for its children.
pub enum HittableObjectType {
    Sphere,
    MovingSphere,
    XyRectangle,
    XzRectangle,
    YzRectangle,
    AabbBox,
    BvhNode,
}

pub struct HittableObjectIndex {
    pub object_type: HittableObjectType,
    pub index: usize,
}

pub struct BvhNode {
    left: HittableObjectIndex,
    right: HittableObjectIndex,
    aabb: Aabb,
}
And then there is a recursive method that traverses the array of BVH nodes. The first node of this array is always the root of the scene.
Speed
So, did this really bring any speedups ?
| Three Spheres | Big Scene | Cornell Box | Perlin and Earth | |
|---|---|---|---|---|
| Data Oriented | 3682,6 ms | 282410 ms | 33221 ms | 18627 ms |
| BVH | 4668,2 ms | 55679 ms | 46857 ms | 19210 ms |
Well, this is where we say “it depends”. Although the big scene has an 80% speedup, the cornell box is 41% slower and the three spheres are 26% slower.
So again, if we wanted to render small scenes, this would not be a good idea, but for big scenes, it is. The BVH is kept for subsequent tests, but in a more real use case, it would be pertinent to wonder how the project would be used.
Multithreading
At the end of “Ray Tracing in One Weekend”, one of the exercises left to the reader is to multithread the raytracer. This is where we do that !
Implementation
Thanks to Rust’s Fearless Concurrency and the crate Rayon this was extremly easy to do !
Inside of my render function, I replaced the for loop to a flat_map call on a range.
I could then call Rayon’s into_par_iter() on the range, to convert the iterator to a parallel iterator and boom, multithreading !
pub fn render(scene: &Scene, image_width: usize, image_height: usize) -> Vec<u8> {
    (0..image_height)
        .into_par_iter()
        .rev()
        .flat_map(|j| {
            // Do something...
        }).collect()
}
Speed
| Three Spheres | Big Scene | Cornell Box | Perlin and Earth | |
|---|---|---|---|---|
| BVH | 4668,2 ms | 55679 ms | 46857 ms | 19210 ms |
| Multithreading | 550,87 ms | 7631,3 ms | 5421,2 ms | 2032,8 ms |
As you can see, it’s quite a bit faster ! All of the scenes run between 86,29% and 89,42% faster.
And there isn’t a big difference between scenes, which makes sense since we’re not changing how each pixel is processed, but we’re now computing each pixels in parallel.
No Recurse
This title is a bit of a lie, since I’m not really getting rid of all recursive function call in the program.
This is mostly about a specific function, that handle the computation of the color of a ray. This is tricky since the ray has to bounce multiple times on the objects until it has a credible color. One naive way of implementing it is by having a recursive function, that calls itself with a limit (the ray depth).
The problem with this, is that it can be quite tricky for a compiler to optimize a recursive function.
Luckily, in our case, we can change this by using a loop.
Implementation
So the old function looked like this :
fn ray_color(
    ray: &Ray,
    background_color: &Color,
    hittable_world: &HittableWorld,
    depth: u32,
) -> Color {
    if depth == 0 {
        return Color::black();
    }

    let record = hittable_world.hit_no_limit(ray);

    if record.is_none() {
        return *background_color;
    }
    let record = record.unwrap();

    let emitted = record
        .material()
        .emit(record.u(), record.v(), record.point());

    let scatter = record.material().scatter(ray, &record);
    if scatter.is_none() {
        return emitted;
    }
    let scatter_result = scatter.unwrap();

    let ray_color = ray_color(
        &scatter_result.scattered,
        background_color,
        hittable_world,
        depth - 1,
    );

    emitted + scatter_result.attenuation * ray_color
}
We can see that we shoot a ray, if we don’t hit anything or don’t have any scatter, we return. Otherwise, we compute ray color once again and multiply it to emitted + attenuation.
The non-recursive version looks like :
fn ray_color(
    mut ray: Ray,
    background_color: &Color,
    hittable_list: &HittableWorld,
    rng: &mut impl RngCore,
) -> Color {
    let mut color = Color::white();
    let mut emitted = Color::black();

    for _ in 0..MAX_DEPTH {
        let record = hittable_list.hit_no_limit(&ray);

        if record.is_none() {
            return *background_color * color;
        }
        let record = record.unwrap();
        let emit = record
            .material()
            .emit(record.u(), record.v(), record.point());
        emitted += color * emit;

        let scatter = record.material().scatter(&ray, &record, rng);
        if scatter.is_none() {
            return emitted;
        }

        let scatter = scatter.unwrap();
        color *= scatter.attenuation;
        ray = scatter.scattered;

        if color.dot(&color) < 0.0001 {
            return emitted;
        }
    }

    emitted
}
In this case there’s a loop that does the “recursion”. We also have two colors we store outside of the loop (color and emitted) and we declare the ray as muttable so we can modify it to be the value of the next ray to process.
Speed
| Three Spheres | Big Scene | Cornell Box | Perlin and Earth | |
|---|---|---|---|---|
| Multithreading | 550,87 ms | 7631,3 ms | 5421,2 ms | 2032,8 ms |
| No Recursion | 549,23 ms | 7584,4 ms | 4141,5 ms | 1694,8 ms |
As we can see, in this case there isn’t a big difference for the three spheres and the big scene. But suprisingly, there’s a 23,61% speed increase for the cornell box and 16,63% for the perlin and earth scene.
I don’t really know why this is. My guess is that when rendering an image that has lighting or that’s heavilly based on textures, this change matters a lot.
Glam
Up until now, the program used a homemade vector type. This can work, and did until now, but I wasn’t using all of the tool possible to make it as fast as possible. One of these are SIMD. Although a vector 3 doesn’t quite fit in an SSE register, if you add padding it does. It’s possible to then use the SIMD instructions for additions, mutliplicatiosn etc.
Implementation
Since I didn’t want to spend too much time on this, I decided to use the Glam library. Also, the library author probably did a better job than I ever could.
Once the library was added to the project, I replaced every usage of the old Vec3, by Glam’s Vec3A.
This is the type that adds padding and can profit of SIMD.
Speed
| Three Spheres | Big Scene | Cornell Box | Perlin and Earth | |
|---|---|---|---|---|
| No Recursion | 549,23 ms | 7584,4 ms | 4141,5 ms | 1694,8 ms |
| Glam | 500,61 ms | 7590,2 ms | 3683,3 ms | 1469,7 ms |
Appart from the big scene, this change brings an improvement between 8,85% and 13,28%.
My guess from the big scene is that the cost in this case is mostly the BVH traversal rather than the math computation.
Faster Random
In this implementation of the raytracer, it’s often needed to get a random value. For example, when a ray is shot, it’s moved in a random direction for the anti-aliasing effect.
Rust doesn’t have random number generation, this means that you have to use a library for that.
The “default” one is the rand crate.
With it, you can get a random number generator using the thread_rng() function :
use rand::prelude::*;

let rng = thread_rng();
let num: u8 = rng.gen();
And since Rust is focused on safety, the default RNG is cryptographically secure, which means that it’s hard to predict the next number based on previously generated numbers. The problem with this is that it generally makes the generator slower. And since in our case we don’t need to be cryptographically secure, we could use an other generator that is faster.
Implementation
So how to we replace it ?
Well sadly we can’t just replace the RNG supplied by thread_rng().
This means I had to manually create the generators in each thread and then supply a mutable reference to them to each part of the program that needs it.
After reading about the different generators on The Rust Rand Book, I decided to use the Xoshiro256Plus generator.
For this I had to add the crate rand_xoshiro to the project.
In case I want to use a faster generator in the future, the mutable reference is passed using the RngCore trait which the base interface of all generators.
fn ray_color(
    mut ray: Ray,
    background_color: &Color,
    hittable_list: &HittableWorld,
    rng: &mut impl RngCore,
) -> Color {...}
Speed
| Three Spheres | Big Scene | Cornell Box | Perlin and Earth | |
|---|---|---|---|---|
| Glam | 500,61 ms | 7590,2 ms | 3683,3 ms | 1469,7 ms |
| Faster Random | 485,97 ms | 7418,7 ms | 3239,9 ms | 1386,8 ms |
The improvement is not a big one, but we do get an improvement between 2,26% and 12,04%.
Compilation Flags
What if we could not change the code at all and make it run faster ? Well, we can !
Although compiling in release already makes the code a lot faster, there are other tweaks that can be done to make the code faster. Most of them are described in The Rust Performance Book.
You can read the book if you want to know more, but here is a quick summary of each options :
- LTO (Link-time Optimization) : Adds optimizations when the program is getting linked
- Codegen Units : By default the Rust compiler tries to parallelize the compilation of your code. You can force it to only use one codegen unit so that it can find more optimizations.
- CPU Specific Instructions : You can tell the program to compile for the current architecture to potentially use more modern instructions that could be faster.
- Abort on
panic!: Rust doesn’t have exceptions, but it does have a panics, that can be catched. If you don’t catch them, you can disable it to gain some performance.
Speed
| Three Spheres | Big Scene | Cornell Box | Perlin and Earth | |
|---|---|---|---|---|
| Faster Random | 485,97 ms | 7418,7 ms | 3239,9 ms | 1386,8 ms |
| Compiler Flags | 409,45 ms | 5872,5 ms | 3119 ms | 1289,1 ms |
This doesn’t change much for the cornell box (3,73% faster) but for the big scene it’s 20,84% faster !
Conclusion
| Three Spheres | Big Scene | Cornell Box | Perlin and Earth | |
|---|---|---|---|---|
| Naive | 3624,3 ms | 405330 ms | 35313 ms | 18502 ms |
| Optimized version | 409,45 ms | 5872,5 ms | 3119 ms | 1289,1 ms |
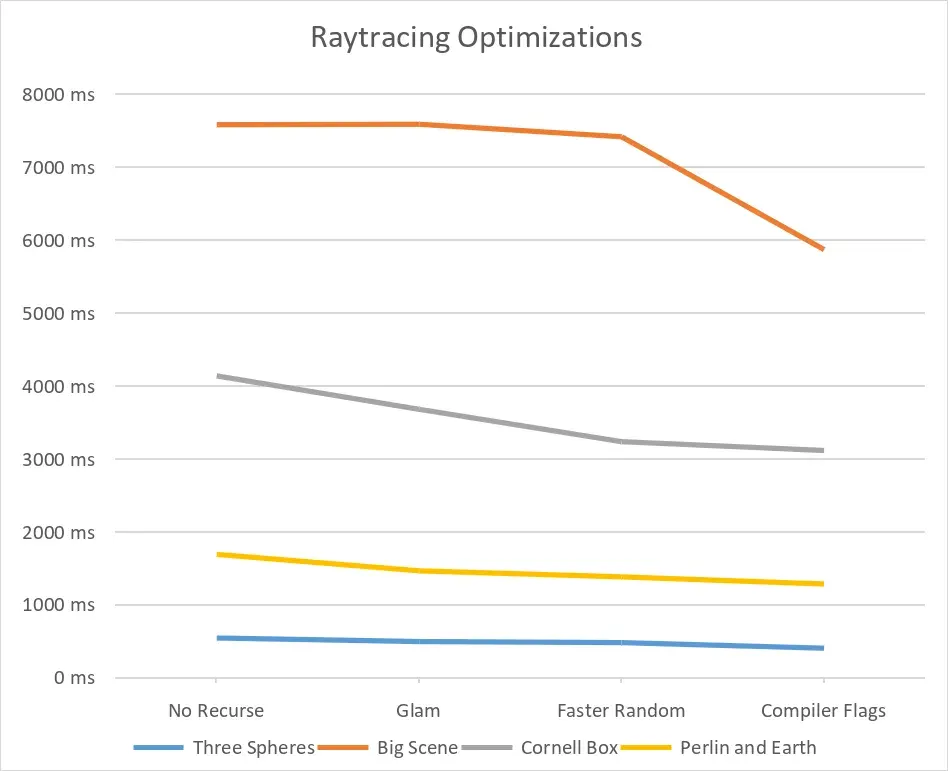
That’s quite a big leap in performances ! Let’s look at it in a more visual way.
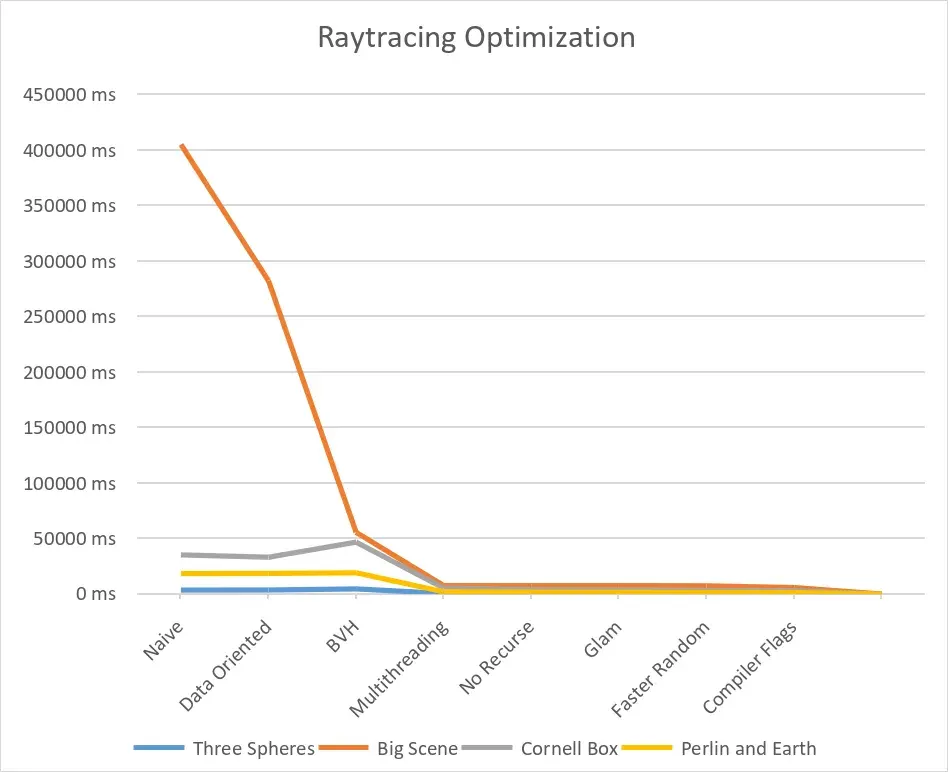
We can’t see much after the multithreading, so let’s zoom in a bit.
And that’s it for the optimizations ! It’s not quite real-time, the GPU might be needed for that. And there are probably other ways to improve the project, such as having a better way to handle the BVH.
Thanks for reading !