Table of Contents
Open Table of Contents
Introduction
When I first started to learn C++, one of the things I found to be the most confusing was using CMake. I learned to program in C# and visual studio really did all of the hard work in term of handling the build so I never had to think about it. At first this made me hate CMake, but since I also wanted to learn how to have a platform independent build system, I decided to learn how to properly use CMake.
But recently, I started to take a look at some game engines tutorials such as Kohi by Travis Vroman and Handmade Hero by Casey Muratori and one thing really surprised me, they both use Batch / Bash scripts to handle the compilation of the project. Since my feelings for CMake where still not very positive, I decided to try using scripts to build a C++ project.
The project
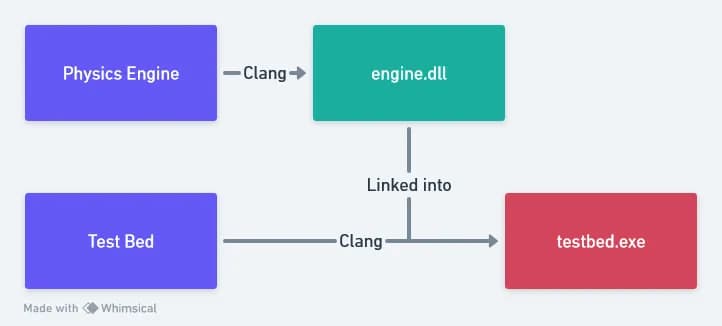
To have something to build, I decided to use my physics engine and build it as a shared library. This library is then linked into a test bed executable that uses the library.
The folder structure of the project looks something like this :
build_system_tests/
├── bin/
│   └── testbed.exe
├── stowy_physics_engine/
│   └── build.bat
├── testbed/
│   └── build.bat
└── build_all.bat
If you don’t care about reading my explanations and just want to read the code, you can check it out on GitHub.
Batch
So setup with Batch files is very much inspired by the one that is in the Kohi tutorial series.
I just added the option to be able to call the script with release afterwards to build with optimisations on.
The first part of the script is about checking if we want to build in release,
get every .cpp files and setting the compiler flags in variables.
Then we call clang to build the project.
@REM Build script for stowy physics engine
@ECHO OFF
SetLocal EnableExtensions EnableDelayedExpansion

REM Check if we want to build in release and save it to a variable
IF "%1" EQU "release" ( SET isRelease=release) else ( SET isRelease=)

REM Get a list of all the .cpp files.
SET cppFilenames=
FOR /R %%f in (*.cpp) do (
    SET cppFilenames=!cppFilenames! %%f
)

SET assembly=stowy_physics_engine

SET compilerFlags=-std=c++20
IF DEFINED isRelease (
    SET compilerFlags=!compilerFlags! -O3
) else (
    SET compilerFlags=!compilerFlags! -g3
)

SET includeFlags=-Isrc
SET linkerFlags=-shared

SET defines=-DSTWEXPORT
IF DEFINED isRelease (
    SET defines=!defines! -DNDEBUG
) else (
    SET defines=!defines! -DDEBUG
)

IF DEFINED isRelease ( ECHO Building %assembly% in release...) else ( ECHO Building %assembly% in debug...)
clang++ %cppFilenames% %compilerFlags% -o ../bin/%assembly%.dll %defines% %includeFlags% %linkerFlags%
And with that we can build the library. The executable has a pretty similar script, just with different flags to be able to link against the library.
Then the script to build both is also pretty simple. It basically creates the bin directory then call each script in their own directory.
@ECHO OFF
REM Build Everything

ECHO Building everything...

if not exist bin mkdir bin

PUSHD stowy_physics_engine
CALL build.bat %1
POPD
IF %ERRORLEVEL% NEQ 0 (echo Error:%ERRORLEVEL% && exit)

PUSHD testbed
CALL build.bat %1
POPD
IF %ERRORLEVEL% NEQ 0 (echo Error:%ERRORLEVEL% && exit)

ECHO All assemblies built successfully.
And that’s it for Batch. So is it something that I would recommend ?
Pros
- Platform specific : we don’t have to bother with being able to build on Linux
- Relatively short
Cons
- Platform specific : we have to rewrite the script in Bash if we want it to work on Linux or MacOS
- Ugly syntax : I know that this is more of a personal opinion, but I think Batch’s syntax is quite horrible and I would not want to write a script that has more than 20 lines with it
- Build is not cached : Every time we build the project, everything is rebuilt from scratch, which takes time.
So since Powershell is kind of the modern version of Batch, I thought that it might have a better syntax than it and so I decided to try it next.
Powershell
I have to confess something for this chapter. I have never actually written a Powershell script in my life, so I thought it could be a good idea to see how ChatGPT would translate my Batch script into Powershell. And believe it or not, but the script that it gave me worked on the first try !
So how does it differ ?
Basically, to find the .cpp files, I was able to use the Get-ChildItem command instead of the weird for loop.
Then, since Powershell can’t insert variables when calling a command, I had to create a string with the command in it
and then call it with Inkove-Expression.
$isRelease = $false

# Check if we want to build in release and save it to a variable
if ($args[0] -eq "release") {
	$isRelease = $true
}

# Get a list of all the .cpp files.
$cppFilenames = Get-ChildItem -Recurse -Filter "*.cpp" | ForEach-Object { $_.FullName }

$assembly = "stowy_physics_engine"

$compilerFlags = "-std=c++20"
if ($isRelease) {
	$compilerFlags += " -O3"
}
else {
	$compilerFlags += " -g3"
}

$includeFlags = "-Isrc"
$linkerFlags = "-shared"

$defines = "-DSTWEXPORT"
if ($isRelease) {
	$defines += " -DNDEBUG"
}
else {
	$defines += " -DDEBUG"
}

$cppFiles = $cppFilenames -join " "
$buildCommand = "clang++ $cppFiles $compilerFlags -o ..\bin\$assembly.dll $defines $includeFlags $linkerFlags"
Invoke-Expression $buildCommand
As before, for the testbed, it’s just different flags, and I won’t talk about the build_all.ps1 script since it’s not that interesting.
Pros
- Nice syntax : I think the syntax is way more pleasant and I could see myself writing a bigger script with it
- Platform specific(ish) : I know that technically Powershell can run on Linux, but I haven’t tried it and it seems too cursed to make me wanna try.
Cons
- Platform specific(ish)
- Build is not cached
Nushell (simple)
Nushell is a cross-platform shell written in rust. Since I wanted to write a script that could work on both Windows and Linux, I thought it could be interesting to try Nushell.
I actually wrote two versions of the script, one that follows the same structure as the previous ones (simple) and one where I defined a custom command to reduce code duplication (improved).
As you can see below, in Nushell you must have a main function in scripts, which is super nice because it allows to have type-safe parameters. Another nice thing is that variables are immutable by default and that the syntax is terser than Powershell.
# Build script for stowy physics engine

def main [input?: string] {
	let isRelease = $input == 'release'

	let cppFiles = glob **/*.cpp

	const assembly = 'stowy_physics_engine'

	let compilerFlags = [ '-std=c++20' (if $isRelease { '-O3' } else { '-g3' })]

	const includeFlags = ['-Isrc']
	const linkerFlags = ['-shared']

	let defines = ['-DSTWEXPORT' (if $isRelease { '-DNDEBUG'} else { '-DDEBUG' })]

	clang++ $cppFiles $compilerFlags -o $'../bin/($assembly).dll' $defines $includeFlags $linkerFlags
}
As you can see I haven’t yet made the changes to make the script cross-platform, it’s really a translation of the previous scripts. But it already brings improvements both when using the script and when writing it.
Pros
- Nice syntax
- Type-safety : Both the parameters and the variables of the script are type-safe
- Cross-platform(ish)
Cons
- Not yet really cross-platform
- Code duplication : Both the library and the exe have similar build script
- Build is not cached
The next version of the script will fix the portability, code duplication and caching problem !
Nushell (improved)
To fix the code duplication problem, I decided to create a build command that would be located in a common.nu file.
Then, each project can source this file and call the build command with their own parameters.
The structure of the project then looks like this :
build_system_tests/
├── build/
│   └── testbed.exe
├── stowy_physics_engine/
│   └── build-cached.nu
├── testbed/
│   └── build-cached.nu
├── common.nu
└── build-all-cached.nu
And the library can source the file like this :
# Build script for stowy physics engine
source ../common.nu
def main [buildType: string = 'debug'] {
# ...
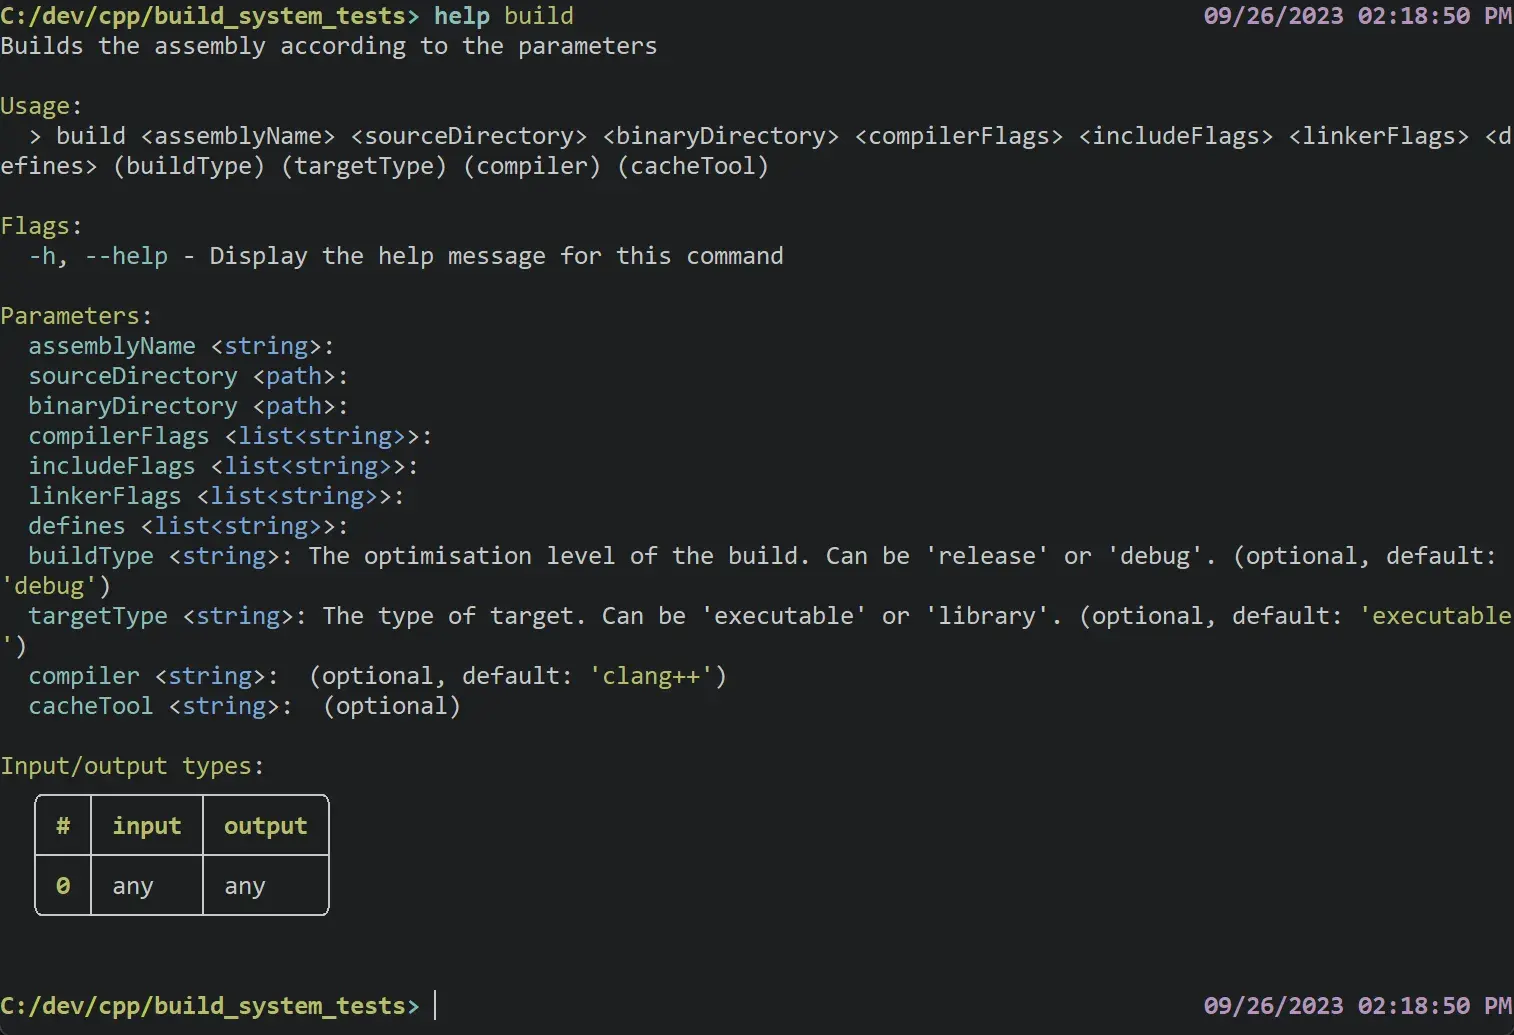
}In common.nu, there is a build command that takes the necessary parameters.
# Builds the assembly according to the parameters
def build [
	assemblyName: string,
	sourceDirectory: path,
	binaryDirectory: path,
	compilerFlags: list<string>,
	includeFlags: list<string>,
	linkerFlags: list<string>,
	defines: list<string>,
	buildType: string = 'debug', # The optimisation level of the build. Can be 'release' or 'debug'.
	targetType: string = 'executable', # The type of target. Can be 'executable' or 'library'.
	compiler: string = 'clang++'
	cacheTool?: string
] {
	# ...
}
Another nice thing from Nushell is that it generates a help page from these parameters.
To use this command, you just have to pass in the arguments that you want.
# Build script for stowy physics engine

source ../common.nu

def main [buildType: string = 'debug'] {
	let isRelease = $buildType == 'release'

	# Setup flags
	let compilerFlags = [ '-std=c++20' '-fPIC' (if $isRelease { '-O3' } else { '-g3' })]
	let includeFlags = ['-Isrc']
	let linkerFlags = ['-shared' ]
	let defines = ['-DSTWEXPORT' (if $isRelease { '-DNDEBUG'} else { '-DDEBUG' })]

	build stowy_physics_engine 'src/' '../bin/' $compilerFlags $includeFlags $linkerFlags $defines $buildType library 'clang++'
}
Now let’s see how the build command is made. First we check if we’re building in release and the we split the compiler name.
let isRelease = $buildType == 'release'
# We need to split the compiler to handle cases such as
# "zig c++" because run-external doesn't like spaces
let splitCompiler = ($compiler | split row ' ')
I will go into more detail on why we split the compiler name once we arrive at the part with run-external.
Then we need to define the name of the assembly.
It will depend on whether we’re on windows or linux and on whether we’re building a library or an executable.
Then the path is split then joined, this is to have a path that doesn’t mix / and \.
This isn’t strictly necessary, but I did it just to be on the safe side.
let assemblyOutputFile = if $targetType == 'executable' {
	if $nu.os-info.name == 'windows' {
		$'($binaryDirectory)/($assemblyName).exe'
	} else {
		$'($binaryDirectory)/($assemblyName)'
	}
} else if $targetType == 'library' {
	if $nu.os-info.name == 'windows' {
		$'($binaryDirectory)/($assemblyName).dll'
	} else {
		$'($binaryDirectory)/lib($assemblyName).so'
	}
} else {
	exit 2
}
let assemblyOutputFile = $assemblyOutputFile  | path split | path join
Then we get the .cpp files and get their path relative to the source directory.
let cppFiles = glob **/*.cpp
let relativeCppFiles = ($cppFiles  | path relative-to $sourceDirectory | path parse)
And now we will build each .cpp file separately into a .o file.
We do that so that we can cache the compilation of each file and also parallelize this step using par-each.
# Build every .cpp to .o and get a list of every .o
let objectFiles = $relativeCppFiles | par-each {|relativeCppFile| (
	# Convert from path object to string
	let inputFile = ($relativeCppFile | path join);
	let outputFile = ($relativeCppFile | upsert extension 'o' | path join);

	# Recreate the folder structure of .cpp files for the .o in the binary directory
	let inputDirectory = ($relativeCppFile | get parent);
	mkdir ($'($binaryDirectory)/($inputDirectory)');

	# concatenate the .o file with the bin directory
	let outputFileWithDir = ($'($binaryDirectory)/($outputFile)' | path split | path join);
	let sourceFileWithDir = ($'($sourceDirectory)($inputFile)' | path split | path join);

	if $cacheTool != null {
		run-external $cacheTool $compiler '-c' '-o' $outputFileWithDir $sourceFileWithDir $defines $includeFlags $compilerFlags
	} else {
		run-external $splitCompiler.0 ($splitCompiler | range 1..) '-c' '-o' $outputFileWithDir $sourceFileWithDir $defines $includeFlags $compilerFlags
	};

	$outputFileWithDir
)}
As you can see, we now use the splited compiler.
This is here because if you try to run a command that has a space in its name with run-external
it will try to find an executable with this exact name and fail.
But if you’re familiar with Nushell, you might wonder why I don’t use the syntax with ^ to run the command ?
Because yes I could write
^$compiler -c -o $outputFileWithDir # ...But this had the problem where the command would return before it was done with building the .o,
which was then a problem when the linker tried reading .o files that didn’t exist.
The only way I find to mitigate this was to use run-external.
I guess this is just what happens when you use something new like Nushell, bugs will happen.
Anyway, now that the .cpp files are built, we can link them.
run-external $splitCompiler.0 ($splitCompiler | range 1..) '-o' $assemblyOutputFile $objectFiles $linkerFlags $includeFlags $defines $compilerFlagsAnd tada ! We have a project that can build on both Windows and Linux and that supports caching !
Pros
- Nice syntax
- Type-safety
- Cross-platform
- Cached build
Cons
- Bugs : I had to go through some hoops to avoid bugs from Nushell
But what if we could have a build system with a nice syntax, type safety, portability, cached builds and no bugs ? Well, this is where Zig comes in !
Zig
Zig is a programming language that places itself as a C successor, but the toolchain also comes with a C++ compiler !
You can create a build.zig file in your project with a build function and zig will build this file and then run it.
This will then build the project.
const std = @import("std");
const Builder = @import("std").build.Builder;

pub fn build(b: *Builder) void {
	// ..
}
Then we need to add the default target and optimize options.
const target = b.standardTargetOptions(.{});
const optimize = b.standardOptimizeOption(.{});
And now we can start defining our project. This time I decided to not put it in multiple file, so the two projects will be defined here. For the library, we need to create a new shared library and then give it the different parameters.
const stowyPhysicsEngine = b.addSharedLibrary(.{
	.name = "stowy_physics_engine",
	.target = target,
	.optimize = optimize,
});
stowyPhysicsEngine.linkLibCpp();
stowyPhysicsEngine.force_pic = true;
stowyPhysicsEngine.addCSourceFiles(
	&.{"stowy_physics_engine/src/math/Vector2.cpp"}, // And other...
	&.{ "-std=c++20", "-DSTWEXPORT" }
);
stowyPhysicsEngine.addIncludePath(.{ .path = "stowy_physics_engine/src/" });
And then we add the test bed.
const testbed = b.addExecutable(.{
	.name = "testbed",
	.target = target,
	.optimize = optimize,
});
testbed.linkLibCpp();
testbed.linkLibrary(stowyPhysicsEngine);
testbed.addIncludePath(.{ .path = "stowy_physics_engine/src/" });
testbed.addIncludePath(.{ .path = "testbed/src" });
testbed.addCSourceFiles(&.{"testbed/src/main.cpp"}, &.{"-std=c++20"});
testbed.linkSystemLibrary("c++");

// LTO is enabled by default, but doesnt work on windows...
testbed.want_lto = false;
Remember when I said without bugs ? Well, I kinda lied… Zig by default enables Link Time Optimizations, but it doesn’t work on Windows. So we need to disable it to have a working build.
And then we can add a run step to the build.
This means that we’ll be able to do zig build run to build and run the program.
b.installArtifact(testbed);

const run_cmd = b.addRunArtifact(testbed);
run_cmd.step.dependOn(b.getInstallStep());

if (b.args) |args| {
	run_cmd.addArgs(args);
}

const run_step = b.step("run", "Run the app");
run_step.dependOn(&run_cmd.step);
And that’s all we have to do to build out project with Zig. One nice thing that comes with this approach is that Zig comes with Windows headers. This means that if you build an app that uses the Windows API, you don’t always have to install Visual Studio (although that could mean you can’t use some modern features).
Pros
- Nice syntax
- Type-safety
- Cross-platform
- Cached build : Zig has its own cache
- No need for Visual Studio for Windows Headers
Cons
- No LTO on Windows
CMake
And to close this blogpost, let’s take a look at the C++ industry standard : CMake.
Well first the top level CMakeLists.txt file is pretty simple, we just create the project and add the subdirectories.
cmake_minimum_required(VERSION 3.27)

project("BuildSystemTests")

if(NOT CMAKE_BUILD_TYPE)
  message("Build Type not set, defaulting to Debug...")
  set(CMAKE_BUILD_TYPE Debug)
endif()

add_subdirectory("stowy_physics_engine")
add_subdirectory("testbed")
And then we can configure the library by listing its source files.
cmake_minimum_required (VERSION 3.27)

project("StowyPhysicsEngine")

set(CMAKE_CXX_STANDARD 20)
set(CMAKE_CXX_STANDARD_REQUIRED True)

add_library(StowyPhysicsEngine)

set(public_headers "src/math/Vector2.hpp")

target_sources(StowyPhysicsEngine PRIVATE "src/math/Vector2.cpp" ${public_headers})

target_include_directories(StowyPhysicsEngine PUBLIC ${CMAKE_CURRENT_SOURCE_DIR}/src/)
target_compile_definitions(StowyPhysicsEngine PUBLIC STWCMAKE)
Pros
- Cross-platform
- Cached build : Will depend on what kind of project CMake generates
- Compiler Independent
- Standard of the language
- Very easy to include libraries that use CMake
Cons
- Hard to learn
- Weird syntax
Conclusion
So after looking at everything, what will I use in my next C++ project ? I think I’m gonna stay with CMake, the fact that it’s so easy to use 3rd party code with it makes it a no brainer. Also, now that I’ve learned to use it, I think it’s the simplest way to get things done. I lost so much time debugging weird things when I used Nushell and Zig that it made me like CMake. I just wish that there was an even better option out there, every time I touch a C++ project, I miss Cargo.
I know there are options like Premake, xmake or Meson but even without having used them, I something tells me I will have a bad time trying to use a CMake only library with them.